

There’s a reason beams have been showing up in every Fixer Upper reveal for the last decade: they add instant warmth, weight, and architectural drama to a flat ceiling. The catch? Real reclaimed beams are heavy, expensive, and usually require a contractor to install. Enter the DIY faux wood beam — a hollow, lightweight build that delivers the same visual impact for a fraction of the cost.
These 15 tutorials cover every variation of the project — from $20 pine box beams and cheap cedar fence-picket builds to ultra-lightweight Styrofoam versions and a no-damage rental-friendly option that hangs with Command strips. Each one is a real DIY that has been photographed and documented by its creator.
1. Hollow Pine Box Beams with Metal Straps — Jenna Sue Design
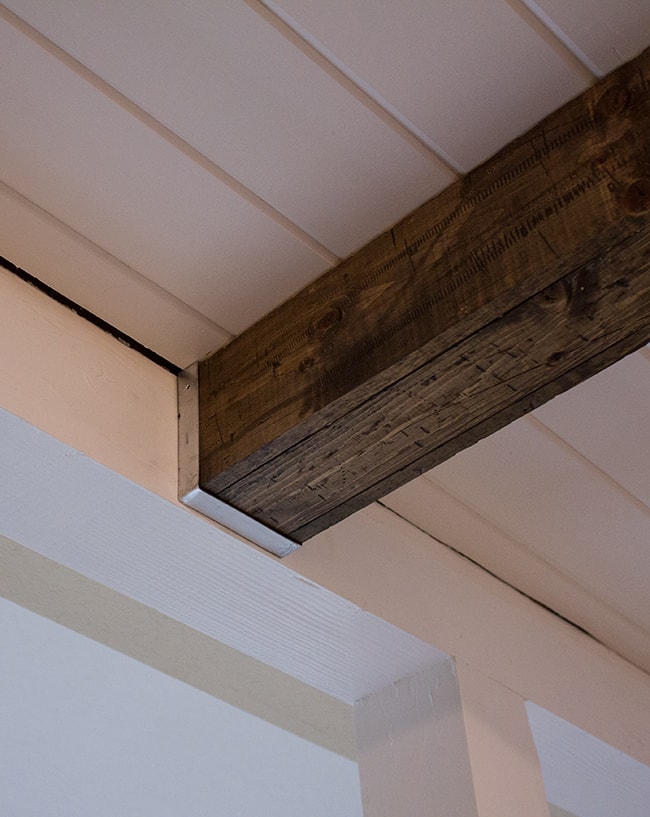 Photo: Jenna Sue Design. Alt text: “DIY pine box beam with decorative metal strap mounted on white plank ceiling.”
- Materials: 1×4 and 1×6 cheap whitewood boards from Lowe’s, 16-gauge nail gun + nails, miter saw, drill, wood screws, stain of choice, metal beam straps, wood glue, clamp.
- Cost: ~$200 total (including stain and a box of screws).
- Difficulty: Beginner to intermediate.
- Skinny boxes of 1×6 joined with 1×4 cleats, distressed with a hammer and stain, then mounted over 1×4 backers screwed into the ceiling joists. The decorative black-metal straps cover seams and add a rustic-industrial detail.
2. Under-$20 Pine Box Beam — Frugal Family Times
Photo: Frugal Family Times. Alt text: “Empty three-sided pine faux beam box on a workbench during assembly.”
Photo: Frugal Family Times. Alt text: “Close-up of pine board being weathered-stained to look like reclaimed wood.”
- Materials: Three 1×6×8 pine common boards per beam, scrap blocks for blocking, table saw or circular saw with 45°-angle blade, block plane, nail gun, wood glue, weathered gray stain.
- Cost: Less than $20 per 8-foot beam.
- Difficulty: Beginner.
- The trick is mitering the long edges at 45° to form a tight hollow U-channel, then distressing the surface (hammer dents, dragging a chain) before a multi-layered gray and walnut stain to mimic 100-year-old reclaimed timber.
3. 16-Foot Plywood + Wood Veneer Beam Under $50 — Hambels Get Real
 Photo: Hambels Get Real. Alt text: “16-foot DIY plywood faux wood beam with wood-veneer wrap on angled ceiling.”
 Photo: Hambels Get Real. Alt text: “Stained plywood faux wood beam before ceiling installation.”
- Materials: ¾” PureBond plywood ripped into 10″ × 8′ boards, wood veneer ($13–$26 sheet), contact cement, Kreg jig, dowels, Varathane Ebony + Dark Walnut stain.
- Cost: Under $50 for a 14-foot beam (veneer was the only major cost).
- Difficulty: Intermediate.
- This is the technique to copy when you need a really long beam without a visible seam. The plywood U-channel is butted and splined, then wrapped in real wood veneer using contact cement — the same trick cabinet shops use to hide plywood edges.
4. Cedar Fence Picket Beams — Fresh Mommy Blog
 Photo: Fresh Mommy Blog. Alt text: “Finished cedar fence picket faux wood beams with matching plank ceiling in a bathroom.”
 Photo: Fresh Mommy Blog. Alt text: “Ceiling cleat being screwed into joist for cedar fence picket beam installation.”
- Materials: Cedar fence pickets (~$8 per beam), 2×4 cleats, wood glue, brad nails, stain or filler.
- Cost: About $8 per beam plus under $10 each in cleats/glue/nails.
- Difficulty: Beginner.
- Plain cedar fence pickets from Home Depot become surprisingly legit faux beams once planed, edge-glued around a 2×4 cleat, and dark-stained. The ceiling-plank side project in the same room shows them as a system.
5. Cedar Vaulted-Ceiling Beams with Brass Straps — Classy Clutter
 Photo: Classy Clutter. Alt text: “Vaulted ceiling with DIY cedar box beams and decorative brass straps.”
- Materials: 1×6×8′ cedar boards (×3 per beam), 1×8 cedar board for center peak beam, brad nailer, Varathane Sunbleached stain, 2×4 studs, 3″ wood screws, painter’s tape.
- Difficulty: Beginner.
- Classy Clutter’s tutorial sells the brass-strap detail hard. Snap a chalk line over the trusses, screw short 2×4 cleat blocks every few feet, then slip the three-sided cedar box over them and nail. The straps hide any visible seams between runs.
6. White Oak Box Beam Grid — Honey Built Home
 Photo: Honey Built Home. Alt text: “Coffered white oak box beam grid ceiling in a home theater.”
- Materials: White oak lumber (sides and bottom), poplar 2×6 for hidden inner support structure, 3″ wood screws, pocket-hole screws, 2″ 16-gauge nails, Titebond II wood glue, Timbermate White Oak filler, track saw, miter saw, Kreg jig.
- Skill level: Intermediate to advanced (miter saw tuning + accurate measuring at multiple ceiling heights).
- Why it works: White oak reads “real” even though it’s a hollow box. The poplar inner ladder structure keeps weight low while letting the visible white oak wear the grain. The author nailed the comparison-shopping tip: poplar at MacBeath was half the price of Home Depot.
7. Pine Mantel Restained to Look Like Weathered Oak — Designing Vibes
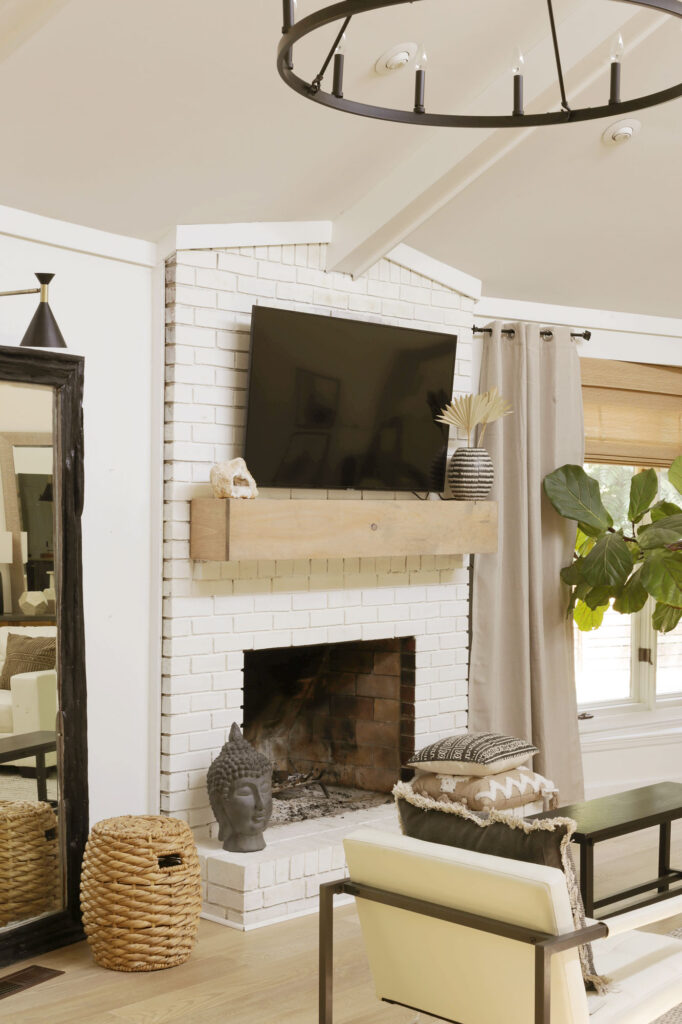 Photo: Designing Vibes. Alt text: “White brick fireplace with fresh DIY weathered-oak faux beam mantel.”
- Materials: Pine common board, pre-stain wood conditioner, Varathane Special Walnut + Weathered Oak stains, SW Argos (or any light gray paint), water, foam brushes, lint-free rags.
- Cost: Around $30 for the wrap-style mantel, ~$40 with stain.
- Difficulty: Beginner (more patience than skill).
- The secret formula: one coat of Special Walnut stain over a conditioned surface, then a thin gray-wash (1 part gray paint to 3 parts water) wiped across the grain. It neutralizes pine’s orange undertone and convincingly mimics weathered oak.
8. Painted MDF Faux Beams — Bre Repoured
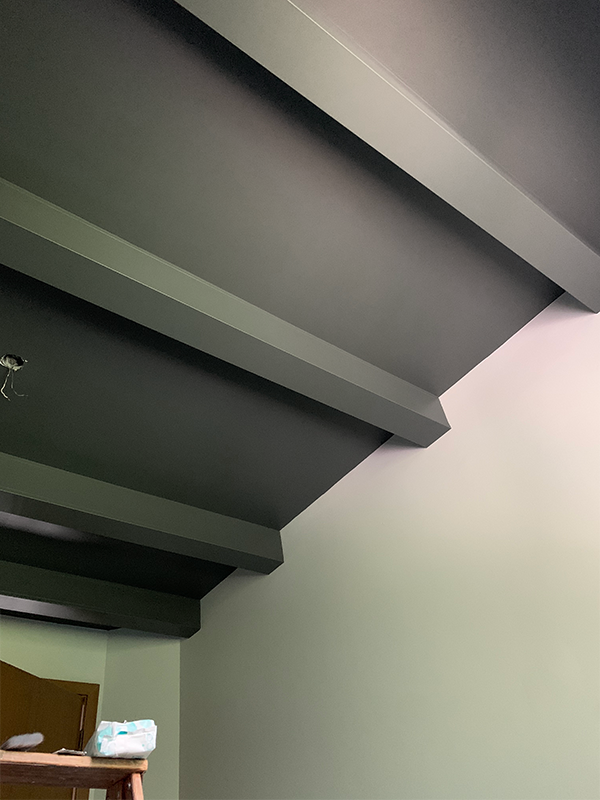 Photo: Bre Repurposed. Alt text: “DIY painted MDF faux ceiling beams on a dark nursery ceiling.”
- Materials: Primed MDF boards, Liquid Nails, brad nailer, painter’s caulk, paint (Sable Evening by Valspar in this case).
- Difficulty: Beginner. Works on standard 8-foot ceilings.
- The whole point: MDF has zero wood grain, which means once caulked and painted it reads as one solid architectural band — closer to plaster than lumber. Spaced 26″ apart and painted the same color as the ceiling (yes, even in a dark color), the beams add depth without making the room feel smaller.
9. Mitered 1×6 + 1×8 Box Beams — The Watson Farmhouse
 Photo: The Watson Farmhouse. Alt text: “Pine boards with 45-degree mitered long edges for faux box beam assembly.”
- Materials: 1×6 (sides), 1×8 (bottom), 2×6 cleat for the ceiling, table saw with sharp 45° blade, finish nailer, Minwax pre-stain conditioner, Olympic Driftwood Gray stain.
- Difficulty: Intermediate (requires clean scarf + miter joints).
- Scarf joints along the long edges plus mitered corners are what make these look like solid timber instead of three pieces of pine. The author’s trick — duct-tape clamps when you don’t own bar clamps — is gold for a one-person build.
10. White-Painted Faux Beams on a Vaulted Ceiling — Remodelando la Casa
Photo collage: Remodelando la Casa, Part 1 and Part 2. Alt text: “Collage of DIYer assembling and installing hollow white faux beams step by step.”
Photo: Remodelando la Casa reveal post. Alt text: “Finished white-painted faux wooden beams on a vaulted living room ceiling.”
- Materials: Pine boards for the hollow box, 2×4 cleats, 1¼” brad nails, Liquid Nails for wall-side seams, sliding bevel to transfer ceiling angles, caulk, Behr White semi-gloss + stain-blocking ceiling paint.
- Difficulty: Intermediate (sloped/vaulted ceilings add transfer-the-angle math).
- A full A-to-Z in three parts. Cleats first, then assemble-then-trim, then caulk + paint. The author pinned taped spacer blocks along the bottom edge to create a crisp “reveal lip” where the beam meets the ceiling soffit.
11. Tongue-and-Groove Plank Ceiling + Matching Box Beams — Come Stay Awhile
 Photo: Come Stay Awhile. Alt text: “Matching hollow faux beam and plank ceiling inside a ceiling alcove.”
- Materials: ¼” Sande plywood ripped into 5″ planks (×2 sheets), Select Pine boards for the hollow faux beams, common boards for cleats, pre-stain conditioner, Early American + Weathered Oak stains, Behr Kaffee brown paint (for gaps), 18-gauge brad nailer.
- Cost: $302 total — $220 in lumber, $29 in plywood, $24 in stain.
- Difficulty: Intermediate.
- Working “as a system” is the move here: the planks and the beams share the same stain, so the whole ceiling reads as one architectural element. The author spaces each plank with a quarter (literally) to leave a consistent reveal gap painted brown for shadow-line contrast.
12. Tray-Ceiling Faux Beams with Diagonal-Angle Screws — Frills and Drills
Photo: Frills and Drills. Alt text: “Three dark-stained hollow pine faux beams on a white tray ceiling dining room.”
- Materials: Six 1×6×8 common boards ($74.28), six 1×8×8 ($86.66), Varathane Briarsmoke stain, 2.5″ coarse-thread wood screws (driven at alternating angles every 8–12″), finish nailer + air compressor, scrap 1× + 2× for L-brackets into side walls.
- Cost: $172 for 3 beams in a 12-foot-ceiling dining room.
- Difficulty: Intermediate (alone-on-a-ladder work).
- The genius detail: the joists run parallel to the beams, so she skipped them and used coarse-thread screws at opposite angles into drywall plus L-brackets biting into the wood side walls. Don’t try it unless your ceiling is 12 feet and your joists just won’t cooperate.
13. Faux Beam Fireplace Mantel Cover — Jennifer Rizzo
 Photo: Jennifer Rizzo. Alt text: “Completed DIY pine faux beam fireplace mantel cover on a white brick fireplace.”
- Materials: Pine common board (4 boards per cover — one top, two sides, one front), finish nailer, wood glue, wood filler, dark brown paint for touch-up, the original mantel.
- Cost: ~$20.
- Difficulty: Beginner.
- This is the smallest, easiest build on the list, and it’s also the one with the highest “wow per dollar.” No miter joints required: it sits as a cap on top of an existing mantel and simply looks bigger.
14. Rental-Friendly Plastic-Box + Contact-Paper Beams — DIY Dalia
Photo: DIY Dalia. Alt text: “DIY renter-friendly faux wood beam being installed on a bathroom ceiling.”
Photo: DIY Dalia. Alt text: “Finished rental friendly faux wood beam in a bathroom with terracotta tile wall.”
- Materials: Plastic “curtain rod” shipping boxes, wood-grain contact paper, squeegee or plastic card, utility knife + needle (for bubbles), Command strips, L-brackets, brown craft paint (thinned) to dull the shine.
- Cost: $22 per box (or less if you sell the curtain rods inside).
- Difficulty: Beginner.
- If you can’t drill, can’t patch drywall, and can’t lose your damage deposit, this is the only option that actually works at scale. Command strips take the full weight because the hollow plastic box weighs almost nothing.
15. Lightweight XPS-Foam Faux Ceiling Beams — Garrison Street Design Studio
 Photo: Garrison Street Design Studio. Alt text: “Light stained faux wood ceiling beams installed across an open living room.”
- Materials: Pre-made XPS-foam faux beams (Barron-style), 2×4 ceiling supports, trim screws, gel stain + brush, hand-held hacksaw, caulk + wood glue + paint for fill.
- Cost: $815 before tax for the whole install ($220 per beam + $80 delivery + $50 stain supplies + $24 lumber).
- Difficulty: Beginner to intermediate.
- A 12-foot beam weighing only 10 lbs is the entire pitch for foam. You mount the 2×4 supports, drop the foam beam over them, and screw in from the sides. No sanding required because the faux-grain texture is molded in.
H2: Materials & Cost Comparison (Quick Reference)
| # | Build | Main material | Cost per beam | Skill |
|---|---|---|---|---|
| 1 | Jenna Sue pine + straps | Pine 1×4/1×6 | ~$50 | Easy |
| 2 | Frugal Family Times | Pine common board | < $20 | Easy |
| 3 | Hambels plywood + veneer | ¾” plywood + veneer | < $50 (14 ft) | Medium |
| 4 | Fresh Mommy cedar picket | Cedar fence picket | ~$8 | Easy |
| 5 | Classy Clutter ceiling | Cedar 1×6 | ~$30 | Easy |
| 6 | Honey Built oak grid | White oak | $ | Hard |
| 7 | Designing Vibes mantel | Pine + custom stain | ~$10 (mantel) | Easy |
| 8 | Bre Repourposed | MDF | ~$25 | Easy |
| 9 | Watson Farmhouse | Pine + miter | ~$40 | Medium |
| 10 | Remodelando la Casa | Pine, painted | ~$35 | Medium |
| 11 | Come Stay Awhile system | Pine planks + beams | $220 (whole room) | Medium |
| 12 | Frills and Drills | Pine common board | ~$57 | Medium |
| 13 | Jennifer Rizzo mantel | Pine common board | ~$20 | Easy |
| 14 | DIY Dalia rental | Plastic box + contact paper | < $25 | Easy |
| 15 | Garrison Street foam | XPS foam prefab | ~$220 | Easy |
H2: FAQ
Will faux wood beams make my ceiling look lower?
Only if your ceilings are below 8 feet. With a 9- to 12-foot ceiling, hollow box beams just create visual interest. With 8-foot ceilings, use lighter (whitewashed or painted) beams so they don’t read as a heavy horizontal bar — Bre Repoured did exactly that in her 8-foot nursery.
What’s the cheapest way to faux a wood beam?
The Frugal Family Times tutorial — three 1×6 pine boards mitered into a U-channel, hammered and multi-stained for under $20 — is the cheapest real-wood option. If even that’s too much, the DIY Dalia plastic-box-and-contact-paper version uses cheaper curtain-rod shipping boxes.
Can I install faux beams in a rental without losing my deposit?
Yes — see DIY Dalia’s bathroom build. The beams weigh almost nothing and hang from a combination of Command strips, L-brackets, and one or two small nails at seams. The whole thing comes down without leaving holes.
What’s the lightest faux beam option?
Pre-made XPS foam faux beams (Garrison Street Design Studio). A 12-foot beam weighs ~10 lbs — so even a single person can hold it overhead on a step ladder.
How do I hide seams between boards?
Three reliable options: 1) wrap with real wood veneer (Hambels method), 2) cover the seam with decorative metal beam straps (Jenna Sue, Classy Clutter), 3) scarf-joint the boards so the seam is invisible at any viewing angle (Watson Farmhouse).
Which stain combo makes pine look like oak?
The Designing Vibes formula: pre-stain conditioner, one thin coat of Varathane Special Walnut wiped off quickly, then a 1:3 gray paint-to-water wash wiped on and immediately rubbed in. It neutralizes pine’s orange undertone convincingly.
Do I need to hit a ceiling joist?
For any hollow wood beam heavier than ~15 lbs/ft, yes — find the joists with a stud finder (Classy Clutter’s trick), drive your cleat into one, and you can hang the beam from the cleat. If your joists run parallel to your beams (Frills and Drills situation), use coarse-thread screws at opposite angles into drywall with L-brackets biting the adjacent stud wall.


